Import a Shadowrocket Subscription and Connect
Complete the initial setup: add → choose a mode → connect → verify → troubleshoot.
Steps use the iPhone and iPad interface. Verify an existing server first, then check rule-based routing.
- An existing subscription or server details
- Steps using English interface terms
- Official App Store screenshots
Before you begin: check installation and connection details
First identify the type of details you have. A link used to update a server list should generally be imported with Subscribe. An individual server's address, port, and authentication parameters should be added using the relevant Type. Use whichever method matches your details; there is no need to import the same information twice. Subscription links may contain personal credentials. Do not post them publicly or give them to unknown tools.
The screenshots below help identify pages and fields; they are not connection details to copy. Available settings vary by Type and app interface. Use the parameters provided by your service provider. For your first attempt, establish one connection that you can verify before setting up multiple subscriptions, complex rules, or automatic connections. This makes problems easier to isolate.
Add a server or import with Subscribe
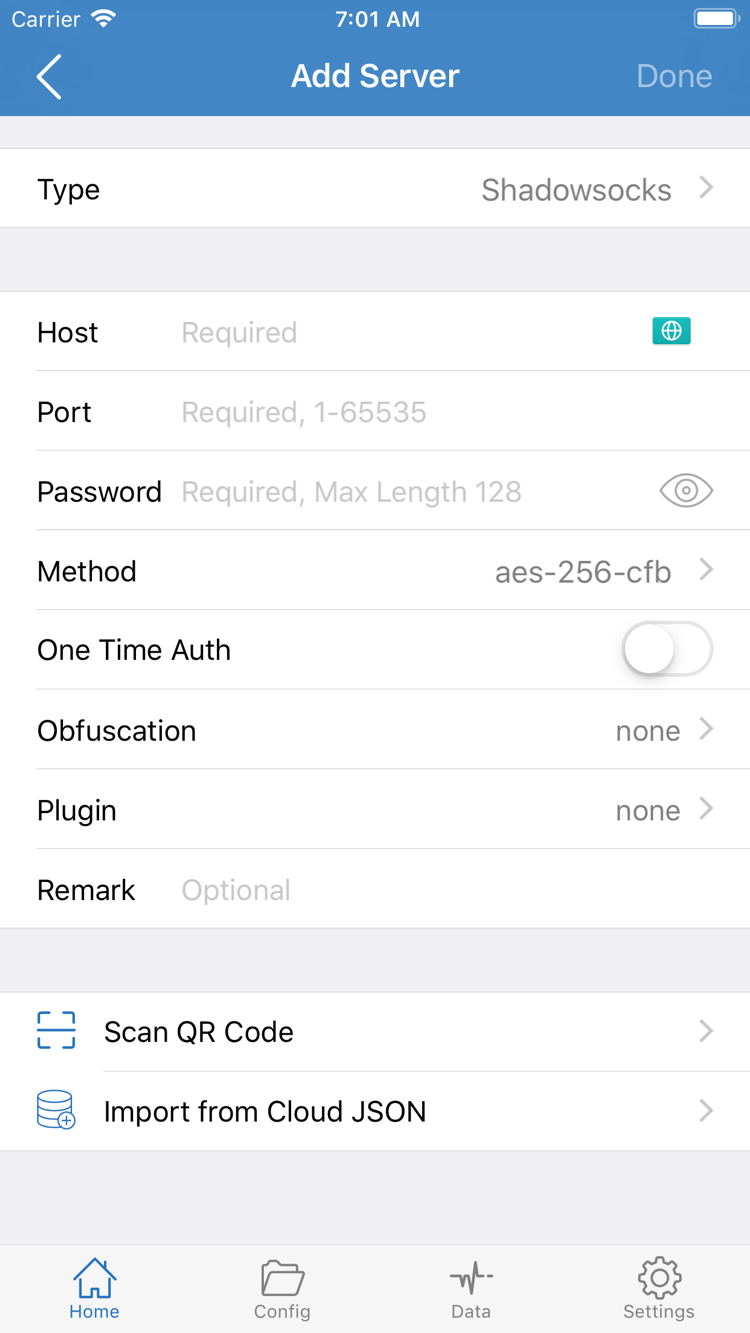
Open Shadowrocket and stay on Home. If a connection is already active, turn off the switch at the top before making changes. Find Add Server, or tap the add option on the page to open Add Server. Choose subscription import or enter an individual server's details, depending on what you have. In either case, return to Home after saving to check the result.
Have a subscription link? Choose Subscribe
In Add Server, select Subscribe from Type and enter the complete subscription link from your service provider in URL. After pasting, check the beginning and end of the link. Remove any quotation marks, explanatory text, or line breaks copied along with it; do not edit its query parameters. Give the subscription a name you can recognize, save, and wait for the list to load. Return to Home and check for the corresponding group and server entries.
Saving a subscription does not connect you. If a group appears but contains no servers, check whether the link is still valid, whether the current network can access it, and whether your service provider requires a newly generated link. Do not confuse a subscription URL with a server's Host: the former retrieves a list, while the latter identifies an individual connection destination. Subscription updates can change the list. Keep the original details before editing parameters so you can identify changes after the next update.
Have details for one server? Select its Type
In Type, choose the protocol that matches your details, such as Shadowsocks, VMess, VLESS, or Trojan. Then check Host, Port, and the authentication and transport fields required for that type. The Password and Method fields shown in the screenshot apply only to relevant types; they are not a universal checklist for every protocol. Do not include a web page path in Host. Port must match the details from your service provider exactly. Preserve the capitalization of passwords, identifiers, and keys.
If you have a QR code, use Scan QR Code and allow camera access when prompted by the system. Import from Cloud JSON is only for data in the corresponding format; do not put an ordinary subscription link there. After importing, open the entry and check its Type and key fields. Finally, return to Home and confirm the entry can be selected under SERVER. Do not judge the connection yet; first choose how traffic should be routed.
Choose one of the three Global Routing modes
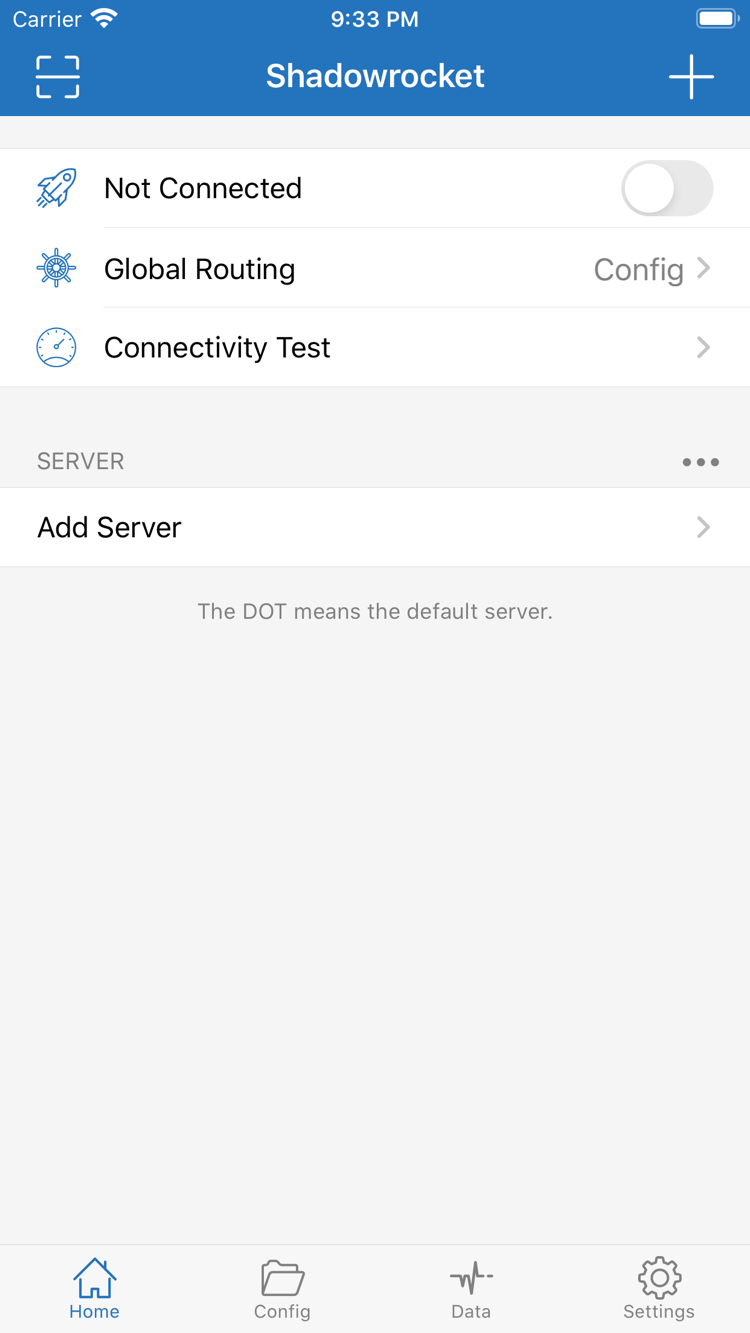
Once a server appears in the list, return to Home and tap Global Routing. This setting determines how requests are routed; it does not fill in missing server details. The three modes are Config, Proxy, and Direct. Decide what you want to test before choosing a mode so you can distinguish server connectivity from rule matching.
Config: match against the active configuration
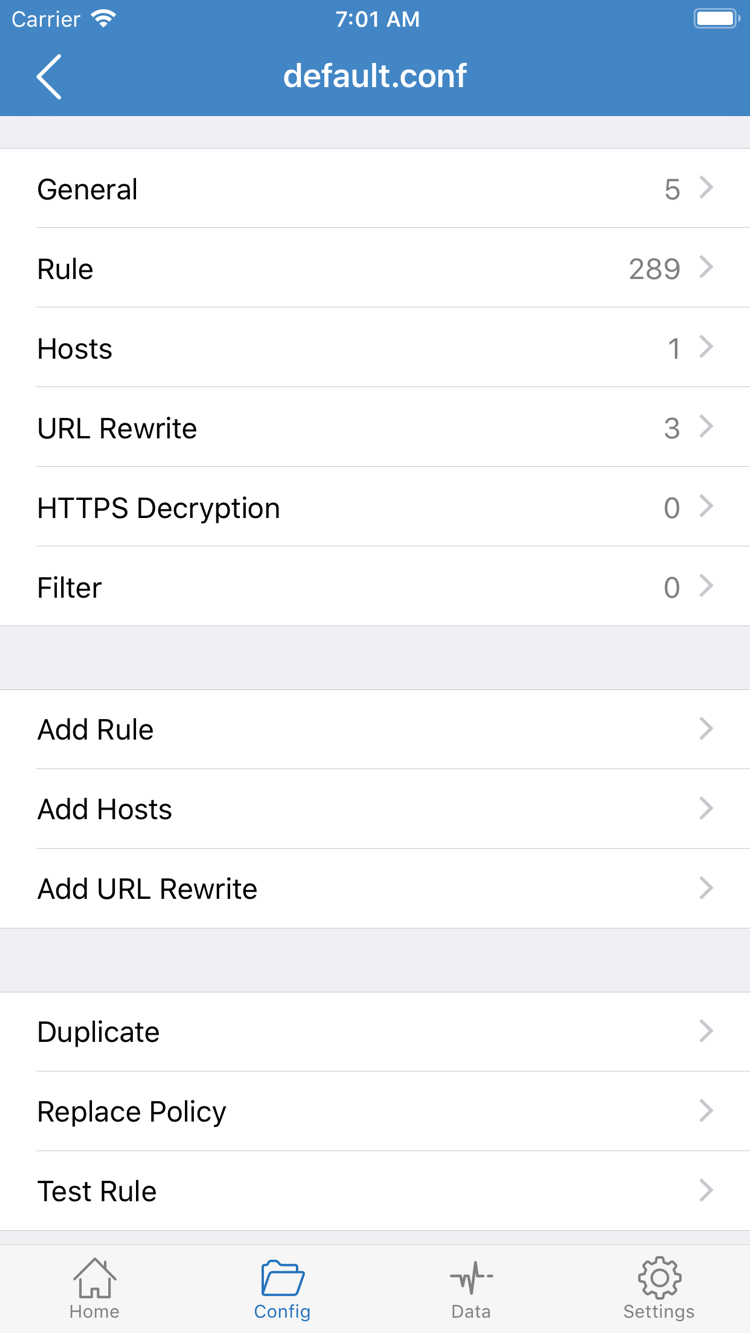
Use Config for everyday routing that separates proxy and direct traffic. Then open Config and confirm that the selected configuration file is the one you intend to use; seeing a downloaded file does not mean it is active. Open the configuration to review sections such as General and Rule. The rules determine whether a request matches PROXY, DIRECT, or REJECT. You do not need to edit each rule during initial setup. Confirm the configuration's source and purpose, and keep the original file for recovery.
For example, the two lines below send requests matching example.com and its subdomains to PROXY, and send other unmatched requests to DIRECT. This snippet explains the syntax; it is not a complete configuration or a template to import for this guide. Rules are matched from top to bottom, so an earlier match determines the result. Keep FINAL at the end of the rules.
DOMAIN-SUFFIX,example.com,PROXY
FINAL,DIRECT
Proxy and Direct: test different causes separately
To briefly check whether the selected server can handle proxy requests, use Proxy first. This reduces the effect of rule branches on the test. Direct checks how a destination behaves over the underlying network; it does not verify the proxy server. These modes are not connection quality levels, nor do they guarantee that all system traffic on the device is handled the same way. System routing and related settings may still affect the actual path.
After switching modes, return to Home and check that the Global Routing row shows the expected option. If a destination works in Proxy but fails after switching back to Config, focus on the active configuration's rules and resolution rather than repeatedly replacing the server. For rule order, policies, and the full configuration structure, see the rule reference. For a quick explanation of terms, see the concept reference.
Select a server, then turn on the connection
After choosing a mode, return to Home. Select the server you want to use in the SERVER group and confirm that the selection indicator is on the intended entry. A subscription group name is not the same as an individual server name; expanding a group does not switch the current server. If several entries have similar names, open one to check its address and Type, then return to select it.
Check Global Routing, then turn on the connection switch at the top of Home. The first time you connect, the system may ask to add a VPN configuration. Read the prompt and confirm that it was triggered by the action you just took, then allow it and complete device authentication as requested. This authorizes the app to establish the relevant network connection; it does not create a server, purchase a service, or correct invalid parameters.
After completing the system prompt, return to Shadowrocket and check whether the status at the top changes from Not Connected. If you previously declined authorization, watch for the system prompt again when you turn on the switch. If the device is managed by an organization or has system restrictions, follow the device management requirements; repeatedly tapping the switch will not resolve them. Do not toggle the switch repeatedly before reading the prompt, or it may be harder to tell whether you are at the authorization stage or the connection stage.
A connection status at the top only indicates that the connection mechanism is enabled. It does not prove that every server in a subscription is available or that every destination is routed through a proxy. Keep the selected server and mode unchanged while testing in the next step. If the switch turns off immediately, note whether a system prompt or error appeared, then check authorization, configuration, and network conditions in the final section.
For your first manual test, avoid changing On Demand at the same time. On-demand connections may reconnect when network conditions are met, making it harder to observe a manual disconnect and reconnect. First confirm that the manual process succeeds repeatedly, then set automatic connection conditions if needed. See the concept reference for an explanation of On Demand.
Verify with tests, actual access, and rule logs
With the connection switch on, run Connectivity Test from Home. It provides information about reachability using the current test method; it does not guarantee that every website or protocol will work. If the test returns no result, do not immediately conclude that all connections have failed. The test destination, method, and current network can all affect the result, so verify with an actual visit as well.
Open a browser and reload the destination page you actually need. Do not rely only on an already-open tab: cached content can make a page appear accessible even when disconnected. Check whether new page content loads, and if needed, cross-check with another destination you are authorized to access. Do not change the server and mode at the same time, or it will be hard to tell which change made a difference.
Check both routes in Config mode
If you use Config, test one destination that your rules should send to PROXY and another that should use DIRECT. The fact that both open does not automatically mean the rules are correct. Also check the connection logs available in the app for the request destination, matched rule, and policy used. DIRECT is meant to connect directly; a page opening through DIRECT does not prove that the proxy server is working.
| Observation | What it means and what to check next |
|---|---|
| Connected status, but the destination does not open | Check the selected server, domain resolution, and rules; do not rely on the status at the top alone. |
| Proxy works, but Config fails | Check the active configuration, rule order, and whether REJECT or an unexpected DIRECT rule matched. |
| No test result, but actual access works | Check Test Method in Settings; do not draw a conclusion from a single test. |
| Only one destination fails | Focus on that destination's rules, resolution, and service status. Keep other working settings unchanged. |
Upload or download readings in Data can help confirm that traffic occurred, but the statistics alone do not prove that a particular rule matched. Check “switch enabled,” “server available,” and “correct routing” separately for a more reliable diagnosis. After a successful test, note the current server, Global Routing mode, and configuration name for future troubleshooting.
Troubleshoot by symptom; change one thing at a time
When something fails, first record what happened: the subscription cannot be read, the switch will not stay on, the test returns no result, or only one destination fails to open. Before opening Settings, turn off the connection and check that the underlying Wi-Fi or cellular network can access the internet normally. If the network requires web-based authentication, complete it before trying again in Shadowrocket.
Empty subscription or incorrect parameters
If there is no server to select, open the subscription entry and check whether the link is complete or expired, and whether your service provider has changed the subscription contents. Before updating it, confirm which group you are working with; there is no need to create multiple subscriptions for the same link. If an individual server fails to connect, check Type, Host, Port, Password, and the fields required by that protocol one by one. Do not use fields from another type to make a configuration look complete.
If one server entry has a problem but another entry you already have connects normally, first check the details and availability of the affected entry. If you need updated details, get them from your service provider. A useful problem report should include the current mode, entry type, and underlying network conditions, rather than only saying “the app cannot connect.” These details determine which part to check next.
Check the switch, test, and actual access separately
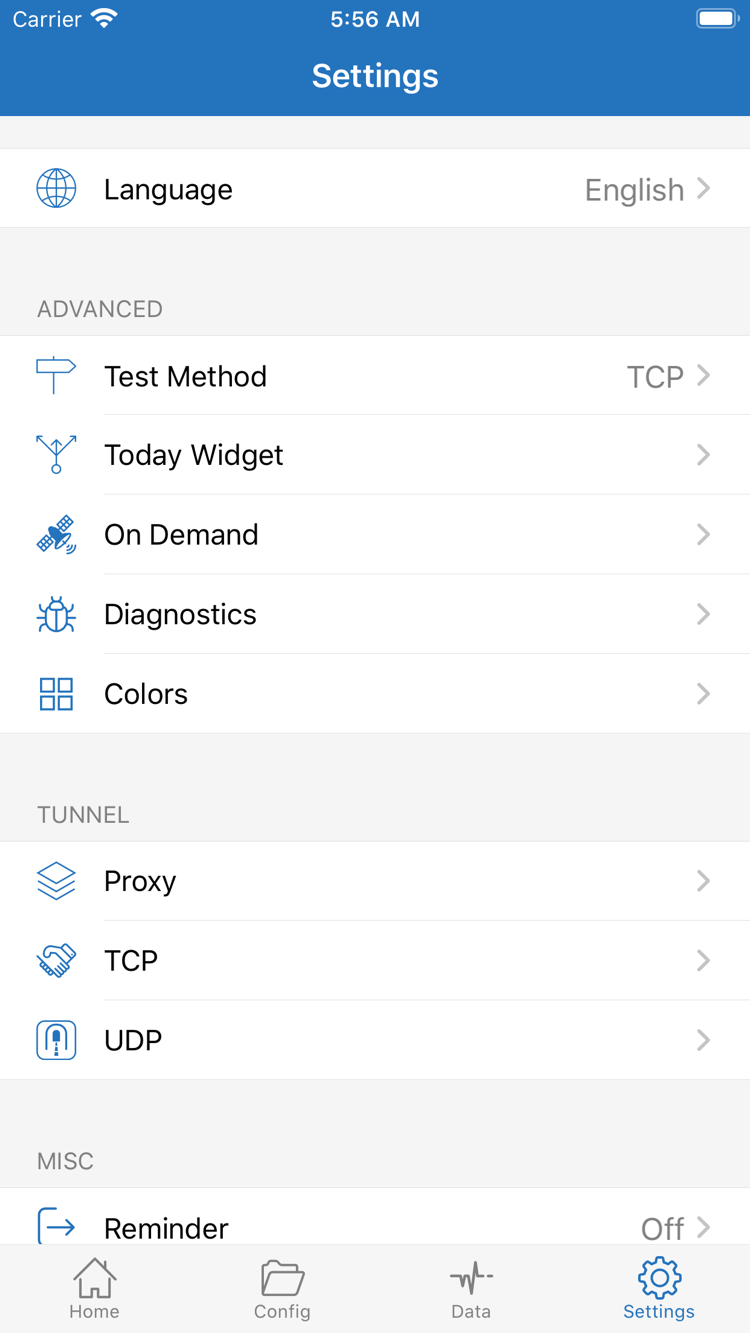
If the switch will not stay on, first confirm that authorization to add the system VPN configuration is complete, then check whether another VPN connection is active or the device has management restrictions. If the test result differs from actual access, open Settings and check Test Method. Note the original selection before trying a method suited to your current purpose. Change one thing, return to Home, and test again before deciding whether to keep it. Do not change DNS, rules, and servers all at once just to make the test show a result.
If Proxy works but Config does not, return to Config and check the active file and Rule order. First check whether the destination matches REJECT earlier than expected, is routed to DIRECT by a rule, or is affected by the final FINAL rule. Do not clear all the rules. Save the original configuration, make an adjustment for a single destination, and test it. See the rules and configuration reference for more detailed troubleshooting.
Prepare concise details if you need to report an issue
Open Diagnostics in Settings to find diagnostic options and collect information about the operation. Note whether the failure occurred on Wi-Fi or cellular, the Type in use, Global Routing, the exact error text, and whether switching to another entry you already have also fails. Before sharing anything, hide complete subscription links, passwords, keys, personal addresses, and account details. Keep only the fields and prompts relevant to the issue in screenshots.
If a change does not help, restore the previous setting before checking the next item. Returning to the last known working combination is easier to reproduce than layering multiple uncertain settings. For authorization, subscription updates, and common interface questions, see the FAQ. This guide completes the initial setup process and does not cover complex configuration.
Keep the working setup, then configure other devices
Once the connection works repeatedly, actual access meets your expectations, and routing in Config is verified, keep the current settings. When updating a subscription or changing rules later, change one category at a time and restore the verified state if something goes wrong. For more rule management, see the rule reference; you do not need to complete every advanced setting during your first connection.